While developing the macOS version of Rhylm, I needed to implement a specific UI behavior: when a user switches audio scenes (e.g., from White Noise to Pink Noise), the tint color of the sliders should transition smoothly from one color to another rather than instantly snapping.
On paper, this sounds trivial—isn’t it just a color animation? However, in the world of SwiftUI + macOS, this turned out to be significantly more difficult than expected.
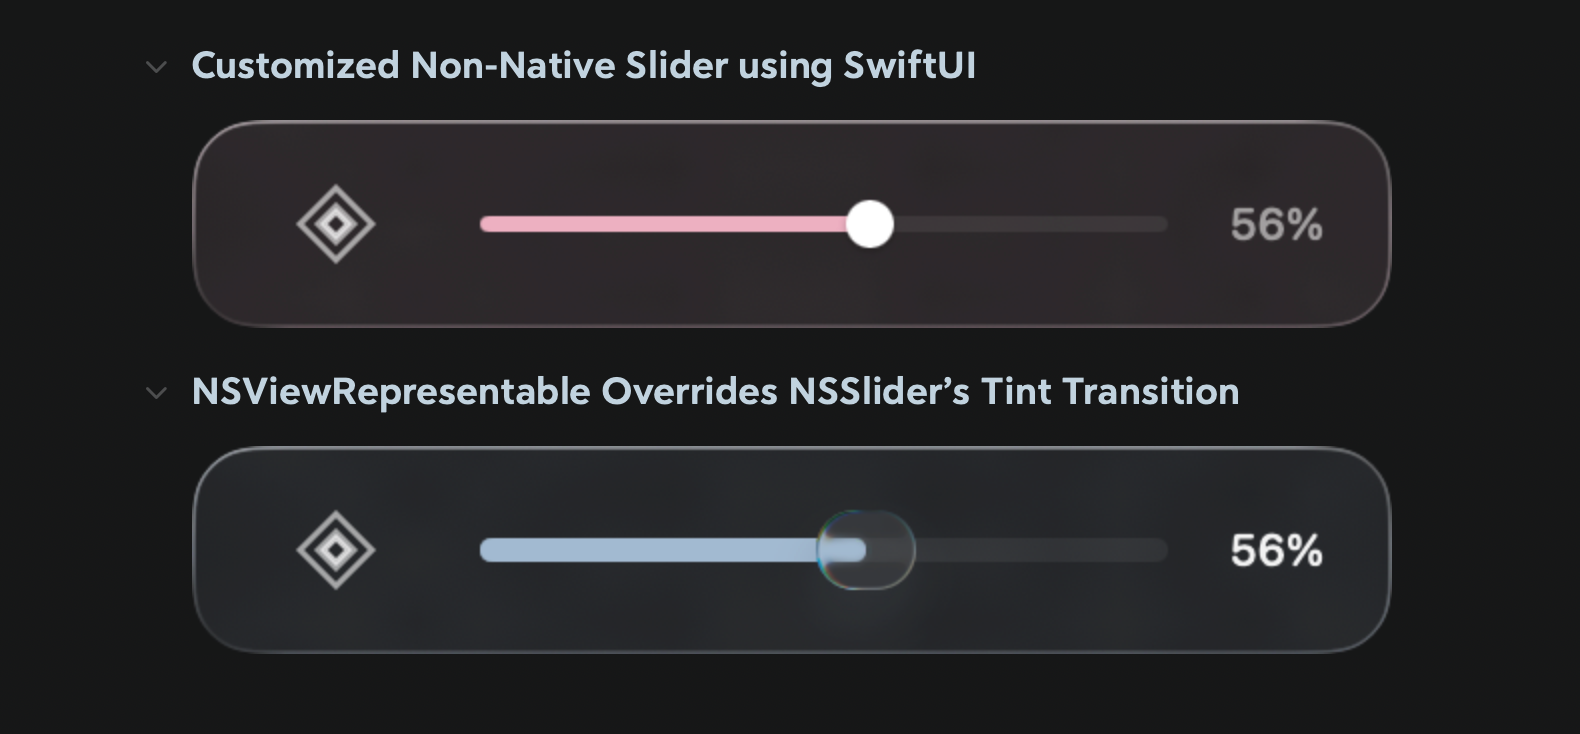
Problem: SwiftUI Slider’s .tint() is Non-Animatable
On macOS, the SwiftUI Slider is essentially a wrapper around NSSlider. When I attempted to use withAnimation or update a .tint() color value frame-by-frame, the color change was always instantaneous.
My initial attempt looked something like this:
Slider(value: $volume, in: 0...1)
    .tint(Color(red: animRed, green: animGreen, blue: animBlue))
I used a 60fps Timer to increment the RGB values. Logically, it was sound—the color values were indeed changing smoothly—but the Slider’s visual representation completely ignored the intermediate states and jumped straight to the final color.
Root Cause Analysis
SwiftUI’s rendering pipeline is declarative. When the parameters of .tint() change, SwiftUI performs a diff to determine if the underlying NSView needs updating. The breakdown occurs here:
.tint()is treated internally by SwiftUI as a “configuration property” rather than an “animatable property.”- The SwiftUI diffing engine may merge multiple rapid updates, skipping intermediate frames to save resources.
- Even if SwiftUI successfully passes the new color to the underlying NSSlider, the NSSlider (which relies on NSCell drawing logic) does not automatically trigger a redraw just because a color property changed.
⠀In short, whether you use withAnimation, explicit Animation, or a manual Timer to update @State, as long as the color is passed via the .tint() modifier, the animation will fail.
Why not use a Custom Slider?
A common suggestion is to build a slider from scratch using GeometryReader and Shape. In which, I did tried to achieve that, and it looks okey.
import SwiftUI

#if os(macOS)
struct AltMacCompactView: View {
    @ObservedObject var audioEngine: RhylmAudioEngine

    // MARK: - Color Animation Status
    @State private var animRed: Double = 0.0
    @State private var animGreen: Double = 0.0
    @State private var animBlue: Double = 0.0
    @State private var isDraggingVolume: Bool = false

    var body: some View {
        // ... skipped ...

        // customized SmoothVolumeSlider
        SmoothVolumeSlider(
            value: Binding(
                get: { Double(audioEngine.masterVolume) },
                set: { audioEngine.setVolume(Float($0)) }
            ),
            color: animatedColor, // animationColor is calculated and passed to the color data
            isDragging: $isDraggingVolume
        )
        .frame(height: 20)
        .onAppear {
            // init color
            let target = currentTargetRGB
            animRed = target.r
            animGreen = target.g
            animBlue = target.b
        }
        .onChange(of: currentThemeColor) { _ in
            // trigger smooth RGB transition
            let target = currentTargetRGB
            withAnimation(.easeInOut(duration: 0.6)) {
                animRed = target.r
                animGreen = target.g
                animBlue = target.b
            }
        }
    }

    // Reconstruct RGB into useable Color
    private var animatedColor: Color {
        Color(red: animRed, green: animGreen, blue: animBlue)
    }

    // get reference's RGB data
    private var currentTargetRGB: (r: Double, g: Double, b: Double) {
        switch audioEngine.currentSoundscape.color {
        case .white: return (0.60, 0.70, 0.80)
        case .pink:  return (0.95, 0.75, 0.80)
        case .brown: return (0.80, 0.70, 0.60)
        }
    }

    var currentThemeColor: Color {
        let c = currentTargetRGB
        return Color(red: c.r, green: c.g, blue: c.b)
    }
}

// MARK: - customized Slider via SwiftUI
struct SmoothVolumeSlider: View {
    @Binding var value: Double // within [0,1]
    var color: Color
    @Binding var isDragging: Bool

    var body: some View {
        GeometryReader { geo in
            let width = geo.size.width
            let thumbPosition = width * CGFloat(value)

            ZStack(alignment: .leading) {

                Capsule()
                    .fill(Color.primary.opacity(0.1))
                    .frame(height: 4)

                Capsule()
                    .fill(color)
                    .frame(width: max(0, thumbPosition), height: 4)

                // Thumb
                Circle()
                    .fill(Color.white)
                    .shadow(color: Color.black.opacity(0.2), radius: 1, x: 0, y: 1)
                    .frame(width: 12, height: 12)
                    .position(x: thumbPosition, y: geo.size.height / 2)
            }
            .contentShape(Rectangle())
            .gesture(
                DragGesture(minimumDistance: 0)
                    .onChanged { drag in
                        let newValue = drag.location.x / width
                        self.value = min(max(newValue, 0), 1)

                        if !isDragging {
                            withAnimation(.easeInOut(duration: 0.1)) {
                                isDragging = true
                            }
                        }
                    }
                    .onEnded { _ in
                        withAnimation(.easeInOut(duration: 0.2)) {
                            isDragging = false
                        }
                    }
            )
        }
        .frame(height: 12)
    }
}
#endif
While this solves the animation problem, you lose all the native visual polish of a macOS slider, including the “Liquid Glass” frosted effect, thumb shadows, press feedback, and system-level accessibility support. For an app aiming for a native feel, that’s too high a price to pay.
Solution
NSViewRepresentable + Manual Frame Interpolation
The Core Idea: Bypass SwiftUI’s declarative rendering pipeline. Use NSViewRepresentable to gain direct access to the NSSlider instance, manually set the trackFillColor, and force a redraw. The solution is split into two layers.
Layer 1: AnimatableNSSlider
We wrap a real NSSlider and use updateNSView to set the trackFillColor and mark the view as needing a display update:
struct AnimatableNSSlider: NSViewRepresentable {
    @Binding var value: Float
    var trackFillColor: NSColor
    var minValue: Double
    var maxValue: Double
    var onEditingChanged: ((Bool) -> Void)?

    func makeNSView(context: Context) -> NSSlider {
        let slider = NSSlider(
            value: Double(value),
            minValue: minValue,
            maxValue: maxValue,
            target: context.coordinator,
            action: #selector(Coordinator.valueChanged(_:))
        )
        slider.isContinuous = true
        slider.trackFillColor = trackFillColor
        return slider
    }

    func updateNSView(_ slider: NSSlider, context: Context) {
        if !context.coordinator.isEditing {
            slider.doubleValue = Double(value)
        }
        // Critical: Set the property directly and force a redraw
        slider.trackFillColor = trackFillColor
        slider.needsDisplay = true
    }

    func makeCoordinator() -> Coordinator {
        Coordinator(self)
    }

    class Coordinator: NSObject {
        var parent: AnimatableNSSlider
        var isEditing: Bool = false

        init(_ parent: AnimatableNSSlider) {
            self.parent = parent
        }

        @objc func valueChanged(_ sender: NSSlider) {
            parent.value = Float(sender.doubleValue)
        }
    }
}
Remarks:
trackFillColor is a property available on NSSlider (macOS 11+). By using NSViewRepresentable, we bypass the SwiftUI .tint() modifier and operate directly on the AppKit layer.
needsDisplay = true forces AppKit to redraw the view in the next display cycle. This is the “secret sauce”—without this line, the NSSlider might not redraw even if the property value has changed.
Layer 2: ColorAnimatingSlider
This wrapper manages the color interpolation. It uses a Timer to calculate new RGB values every frame and passes them down to AnimatableNSSlider. Swift
struct ColorAnimatingSlider: View {
    @Binding var value: Float
    let targetColor: Color
    var range: ClosedRange<Double> = 0...1
    var onEditingChanged: ((Bool) -> Void)?

    @State private var currentRed: Double = 0.5
    @State private var currentGreen: Double = 0.5
    @State private var currentBlue: Double = 0.5
    @State private var colorTimer: Timer?

    private var currentNSColor: NSColor {
        NSColor(calibratedRed: CGFloat(currentRed), green: CGFloat(currentGreen), blue: CGFloat(currentBlue), alpha: 1.0)
    }

    var body: some View {
        AnimatableNSSlider(
            value: $value,
            trackFillColor: currentNSColor,
            minValue: range.lowerBound,
            maxValue: range.upperBound,
            onEditingChanged: onEditingChanged
        )
        .onAppear { snapToColor(targetColor) }
        .onChange(of: targetColor) { newColor in
            animateToColor(newColor, duration: 0.5)
        }
    }

    private func snapToColor(_ color: Color) {
        guard let rgb = color.resolveRGB() else { return }
        currentRed = rgb.r
        currentGreen = rgb.g
        currentBlue = rgb.b
    }

    private func animateToColor(_ color: Color, duration: Double = 0.5) {
        guard let targetRGB = color.resolveRGB() else { return }
        colorTimer?.invalidate()

        let fps: Double = 60
        let totalSteps = Int(duration * fps)
        guard totalSteps > 0 else { snapToColor(color); return }

        var currentStep = 0
        let startR = currentRed, startG = currentGreen, startB = currentBlue
        let deltaR = targetRGB.r - startR
        let deltaG = targetRGB.g - startG
        let deltaB = targetRGB.b - startB

        colorTimer = Timer.scheduledTimer(withTimeInterval: 1.0 / fps, repeats: true) { timer in
            currentStep += 1
            if currentStep >= totalSteps {
                currentRed = targetRGB.r
                currentGreen = targetRGB.g
                currentBlue = targetRGB.b
                timer.invalidate()
            } else {
                let t = Double(currentStep) / Double(totalSteps)
                // Hermite smoothstep for natural easing
                let eased = t * t * (3.0 - 2.0 * t)
                currentRed = startR + deltaR * eased
                currentGreen = startG + deltaG * eased
                currentBlue = startB + deltaB * eased
            }
        }
    }
}
I used the Hermite smoothstep formula ($3t^2 - 2t^3$) as the easing function. It creates a much more natural transition by accelerating in the middle and decelerating at the ends, compared to linear interpolation.
Helper Extension: Extracting RGB Values
extension Color {
    func resolveRGB() -> (r: Double, g: Double, b: Double)? {
        let nsColor = NSColor(self)
        guard let converted = nsColor.usingColorSpace(.sRGB) else { return nil }
        return (
            Double(converted.redComponent),
            Double(converted.greenComponent),
            Double(converted.blueComponent)
        )
    }
}
The data flow looks like this:
- targetColor changes (e.g., Blue → Red).
- onChange triggers, starting the Timer (60fps).
- Every frame:
- Smoothstep calculates the next interpolation step → Updates @State RGB.
- SwiftUI detects the @State change.
- updateNSView() is called.
- Directly sets NSSlider.trackFillColor.
- Marks needsDisplay = true.
- AppKit redraws in the next display cycle.
- After ~30 frames, the Timer ends and the color is exactly at the target.
The magic here is that SwiftUI acts only as a “messenger.” It detects the state change and calls updateNSView, but the actual rendering instructions are sent directly to AppKit, completely bypassing SwiftUI’s internal (and restricted) animation system.
Performance Considerations
The performance overhead of this approach is negligible:
- Minimal Calculation: Each frame only requires three additions and one smoothstep calculation. The redrawn area is tiny—just the slider track, which is a few hundred pixels. AppKit also performs “display coalescing,” ensuring the actual redrawing aligns with the monitor’s refresh rate.
- Temporary Resource Usage: The animation only lasts 0.5 seconds. The Timer is invalidated immediately after completion, leaving zero idle overhead.
One edge case: By default, Timer.scheduledTimer runs on the .default RunLoop mode. If a user happens to drag the slider during the animation, the RunLoop switches to .tracking mode, and the timer will pause. To fix this, add the timer to the .common mode:
RunLoop.current.add(colorTimer!, forMode: .common)
Apply the Approach to Your Own Project
Here you go!
ColorAnimatingSlider(
    value: Binding(
        get: { audioEngine.masterVolume },
        set: { audioEngine.setVolume($0) }
    ),
    targetColor: currentThemeColor,
    range: 0...1
)
.frame(height: 20)
Conclusion
This pattern isn’t limited to sliders. Any NSView property that SwiftUI doesn’t support for animation can be handled with this logic: get the NSView reference via NSViewRepresentable, drive property changes with an external Timer, and force updates with needsDisplay.
Verified on macOS 15, Xcode 16, and Swift 6. Requires macOS 11+ for trackFillColor support.